Pinterest is a great source to boost your blog’s traffic, however, It might become the cause to distract your audience from the original blog content. Think about a vertical, portrait image after every paragraph in your blog post, seems awful right?
Your visitor will also get distracted and lose interest in your blog due to excessive usage of images in a post. Along with that, constant scrolling make it tiresome for some users and it gets difficult to skim through the required information.
Hence, you might feel the need to hide your pinterest images in your WordPress website so that it does not cause image overhead.To do so, you just need to follow these simple steps without much technical knowledge.
Steps to Hide Pinterest Images In Your WordPress Blog Post
There are only two most simple steps to get the job done.
- Sign in to your WordPress blog and create a post
- Add your pinned pinterest images and paste 1 HTML attribute
Let’s discuss these steps in detail
[elementor-template id="8247"]Step-1 : Sign in to your WordPress blog and create a post
Go to your WordPress blog and login to your dashboard. Click on add new post from the left panel.

Step-2 : Add your pinned pinterest images and paste 1 HTML attribute
After creating the post, add the images from Pinterest (the one you used to pin to your blog through Pinterest)
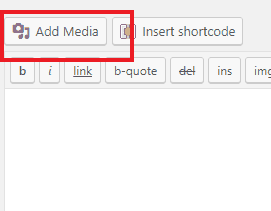
After adding your image, click on the Text tab of your edit window of your blog post.
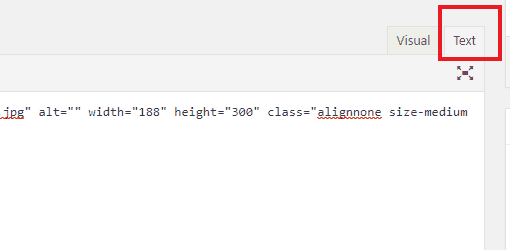
Check the img tag of HTML , and just add the following code within this tag
style = “ display :none; ”
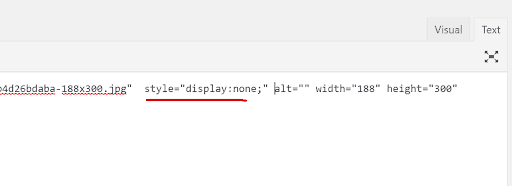
Check your post by clicking on the Visual tab (present beside Text tab) whether your image got hidden or not, since you placed the display property code as none, it should not appear on the post now.
The display property of CSS enables us to ehther show or hide the desired text or image. It does not delete the content but hide it from the screen.
Style is an attribute which is used for styling the HTML tag. Here this is working as an inline CSS which overrides all the previously set CSS (styling) . Now, the style attribute is using a display property, and keeping it none, commands the html post to not display the img tag.
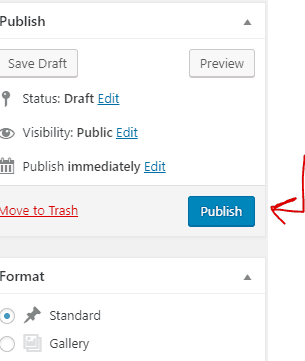
After placing the code , click on Publish button to publish your post.
Boom! You did it! To learn more about WordPress, visit https://wpstairs.com
Pin It!! 
Pin It!!



3 comments
Sam
Thank you for the tips. Actionable, short and sweet 🙂
Donna | The Upward Blip
You made it sound so easy! I am still debating whether to hide my pin images or not. I kinda like looking at them. Lol! Thank you for this though! I can look back to this when I decide to hide the images.
Beth Elkassih
Thank you for the detailed step by step instructions. I plan to implement into my next blog post. Looking forward to all your WordPress tutorials.