
Okay, you’re new to WordPress and you are lost. But now that the site is up and running, it’s time to start collecting information that will help you run the site more smoothly. This is possible if you install Google Analytics in WordPress site. In this post, we will help you do that using a step by step Guide.
Introduction to Google Analytics
Before proceeding to the installation, let’s get to know the tool first. Google Analytics is a service that tracks website and generates multiple reports on different aspects like website traffic, user behavior, goals/conversion, and others. Since this is a free tool, it is a super popular website tracking service.
This tool informs you about traffic received by your website, how do the users interact with the site and from where that traffic originating.It also helps you customize the dashboard with all the relevant information and data you want to view and can export Google Analytics data in multiple formats. All you need to do is install Google Analytics in WordPress.
Do you need this Tool?
YES! Absolutely. If you’re wondering why the Analytics is needed, information is power, Google Analytics is crucial to helping you develop an understanding of the users and visitors of your site.
While setting up a site. You definitely had a goal in mind, perhaps you were targeting a certain age group or a certain location, you need to know how much of the target has been met and what further improvements are needed.
This is where Google Analytics comes in with the data about visitors, their location, and the content of the site they seem to be enjoying. It’s like a guide with numeric results being generated without which you’re clueless how close you’re to your goal and what further you need to work on. Whether what you are creating is working for you or not.
Since its a free tool, you don’t even need to worry about paying for the services
Google Analytics, how does it work?
Google Analytics is implemented by adding a javascript code or a plugin, either of which monitors to see the performance of the site by gathering data. When a visitor visits the site, the code tags them and starts their session for the duration of their stay at the site.
All the pages that you want to gather traffic data from need to have the tracking code. To ensure movements on your site of the visitor, this needs to be done.
All the information tracking visitors provides;
- Sessions: Counts visitors of your website individually.
- Pageviews: Counts pages a visitor visits on your website individually.
- Traffic Source: Where the visitor came from, this could be from a paid ad, a different site, directly to your site, from google search, or social Media etc.
- Session Duration and Pages per Session: Counts the duration of the session which is actually how long a visitor stayed at the site and how many pages were visited by them.
- Bounce Rate: Counts how many visitors bounced from the website which means how many visitors came and immediately left.
- Goals: This is a measure of how many actions provided on the site were completed by people, and how many people were involved. For example, if there’s a form, was it filled? Was it submitted? Who were the visitors who did that etc.
Now, finally let’s proceed to the guide to help install Google Analytics in WordPress.
Steps to Install Google Analytics in WordPress
Step: 1 Creating an Account
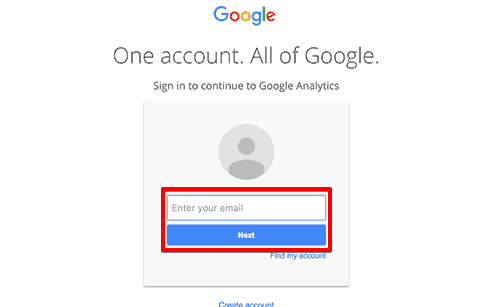
For this you need to login to your Google account. If you don’t have one then just create it. After entering your email, click Next. Then enter your password and just login.
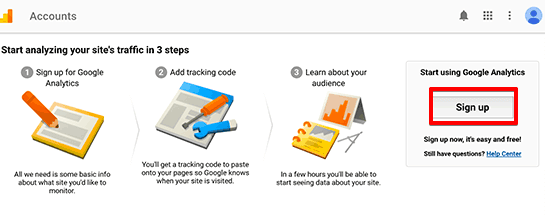
After logging in, go to https://analytics.google.com and Sign Up. Then set up a Google Analytics
Step:2 Get Google Analytics without Plugin
Using this method is relatively harder since it involves copying a snippet of Javascript Code into the header file. We will also be discussing a method of using a plugin to install Google Analytics in WordPress so don’t worry. For that, you can skip directly to step 3.
After you’ve set up a Google Analytics account. Google Analytics tracking code will be presented to you.
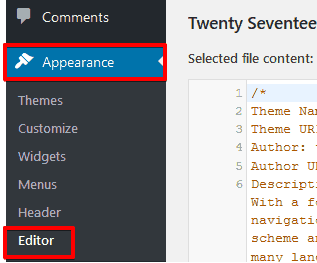
A screen showing a snippet of code will come up. As shown in the screenshot, the code looks something like this and will contain your Google Analytics account number which has been obscured here. First highlight and then Copy the entire code. Now Log in to your WordPress site. From the dashboard, navigate to Appearance, under appearance, click on Editor.
Now on the right hand side. Under Theme Files, scroll until you see Theme Header. Click on the header.php file. All you need to do is Paste the snippet of code from your Analytics profile you previously copied after <body> tag. Then Click Update File.

That’s it! You’ve Successfully finished plugin-less installation of Google Analytics in WordPress.
Step: 3 Google Analytics Using a plugin
A huge advantage of using a plugin is that it makes a lot of work easier. All you need to do is install and activate it. Google Analytics has a plugin for WordPress which enjoys immense popularity called MonsterInsights. It is a free tool that comes with a pro version for more advanced features that beginners don’t usually need.
To begin with, first, install the MonsterInsights plugin and then activate it.
Navigate to the WordPress site. Once there, click on Plugins from the site’s dashboard. Then go to Add New and click on it.

A new screen will be displayed as shown in the screenshot, search MonsterInsights and then Install by clicking on Install Now it as displayed.
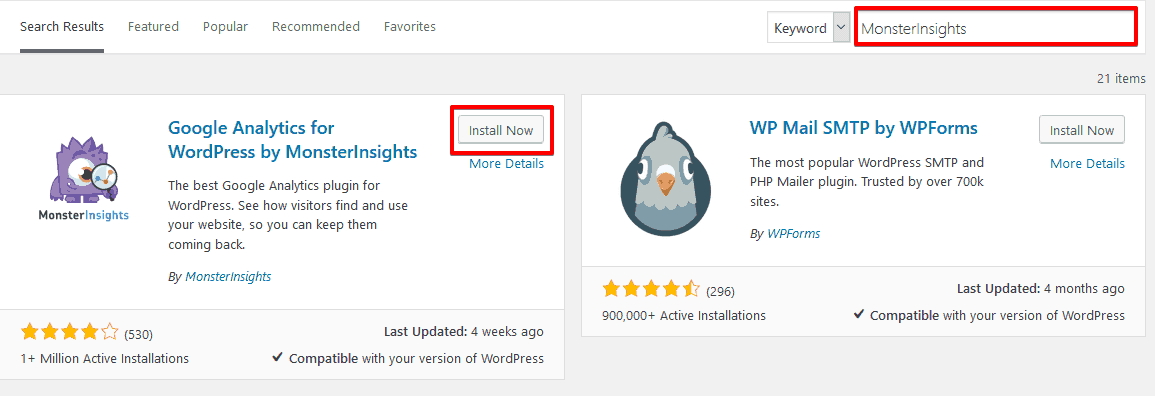
You know the drill. After installation comes activation. Activate it.
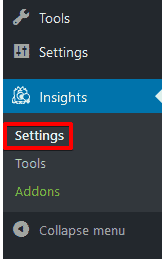
Upon activation, a new item called Insight will be added to your WordPress dashboard by the plugin. Click on Insights. Then go to Settings. Here we will configure the plugin settings.
A new screen will come up, you can either connect to your Google account to authenticate directly or authenticate manually. To connect Google Analytics to your site, Click on ‘Authenticate with your Google account’. You will be redirected to Google accounts sign in to your account. Click Next to continue.


Then MonsterInsights will ask your permission to access your Google Analytics account. For that, click Allow. You will then proceed to the last step.
You will be asked to pick a profile you want to track in the final step. Select your site that you want tracked and simply click Complete authentication button to Finish.
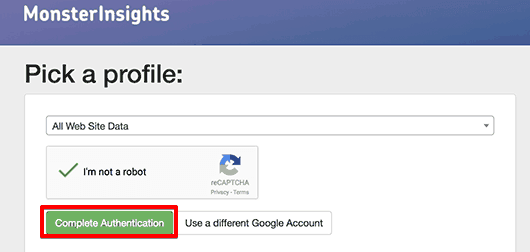
You will then be sent back to your WordPress site. However, if you prefer to do it manually, click on Click here to authenticate manually.
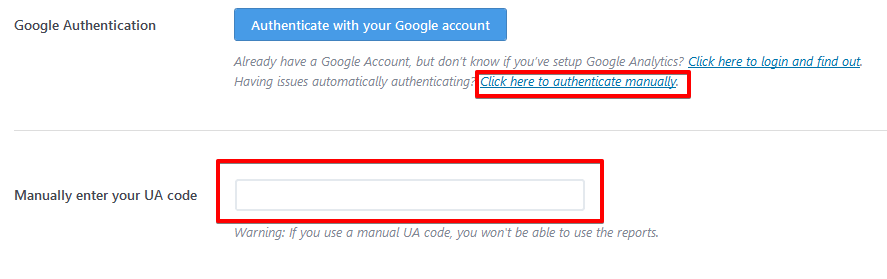
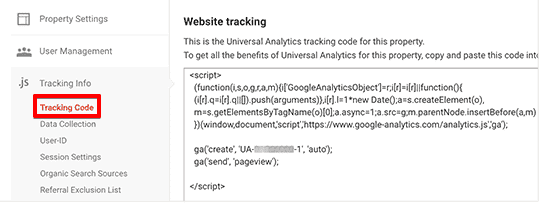
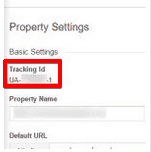
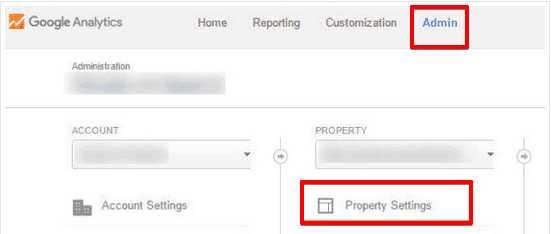
You will have to navigate to Google Analytics account, go to Admin tag, and click on Property Settings. Under the Basic Settings, copy the Tracking ID from the mentioned position in the screenshot.
Then paste the code into the Manually enter your UA code field as shown in the screenshot below.

Click on Save Changes button and you’re done. Your visitor data is now being tracked by you site! To get a comprehensive report, to populate data, a bit of time ranging from 12-24 hours is needed. So give it a bit of rest to view your stats.
Google Analytics in Action
Having finished with the above steps, the guide to install Google Analytics in WordPress site is now complete. We will just take a quick look at the working of Google Analytics before wrapping up. Data will start appearing after 12-24 hours pass in your Google Analytics interface. To see it in action, you need to navigate to Google Analytics. Once there, click on Reporting which will display the data. Audience Overview is the default reporting section.
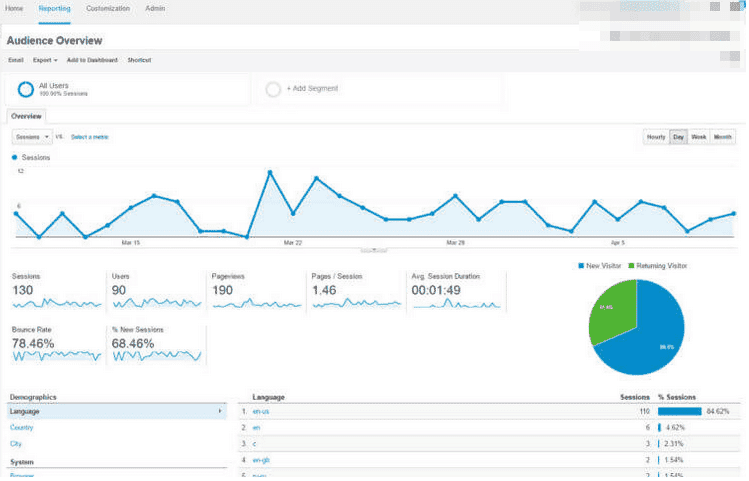
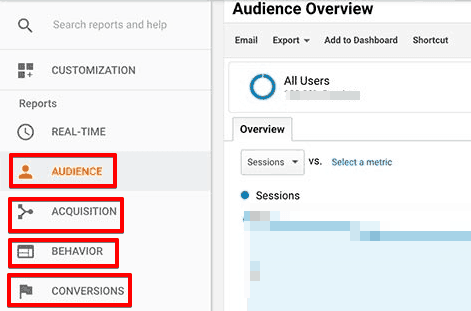
The above snapshot is displaying the screen after logging in to Google Analytics. This screen is going to be displayed by default after all future logins. You can navigate between different data categories using the dashboard displaying reports menu on the left side . Just a Quick tip. The marked areas on the screen shot help you figure out the following:
- Audience →Mobile→Overview: It will display the devices used by people to access your site. You can figure out if you need to switch to a better mobile site by reading these stats.
- Acquisition→Overview→All Traffic→Channels: This displays different channels from where the traffic is being originated and coming to your site. (These can be be Referrals, Paid ads, Google Search, Social Media etc)
- Behavior→Overview: Displays Stats for the pages getting the most traffic/visitors.
Conversions→Goals→Overview: Displays stats by counting the completed goals.
Conclusion
I hope this tutorial to install Google Analytics in WordPress site was easy to follow. If you have any questions I am always here to help. Just drop a comment below. Subscribe for more Tutorials. See you in the Next One! Happy Tracking!


4 comments
Madara
Thanks very nihe blog!
composite
If you wish for to grow your experience simply keep visiting this web page
and be updated with the most recent news update
posted here.
Carly
Very informative & a great read. Thank you for your detailed article.
Esther
Thank you so much for this wonderful tutorial. It is really informative for a beginner blogger like me.